|
|||||||||
|
|||||||||
|

|
|
||||
| |
|||||
| |
|||||
|
|
||||
| |
|||||
| |
|||||
|
|
||||
| |
|||||
| |
|||||
|
|||||
| |
|||||
| |
|||||
|
|
||||
| |
|||||
| |
|||||
|
|
||||
| |
|||||
| |
|||||
|
|||||
| |
|||||
| |
|||||
|
|
||||
| |
|||||
| |
|||||
|
|
||||
| |
|||||
| |
|||||
|
|
||||
| |
|||||
| Tips & Tricks |
What types of images work best?
Tif or EPS formats best preserve the color and sharpness of your pictures. If you are scanning the images your self from photos, save them in one of these formats
What About the resolution?
Scan your images using a resolution of 300dpi at the final dimensions you intend to use. A 300dpi resolution makes colors look smooth and hard objects look sharp.
What about JPGs from my digital camera?
Yes, JPGs from digital cameras are fine. Be sure that when you do the math your pixel resolution is high enough. For example, if your camera puts out a typical image of 1280 x 960 pixels at 72dip, you get about 17" x 13" of photograph (at 72dpi) -- the same amount of detail as an image that is 4"x3" at 300dpi. That means it's safe to reduce or enlarge that image in the layout program up to around 4"x3" in dimension. You should open the photos in your computer and convert them to Tiff or Eps before you do any change or color correction (never go back and save on Jpeg again)
How can I tell what resolution the image from my digital camera is?
If your camera tells you what the pixel dimensions of your images are you can do a little math to determine the resolution and the size to print.
Here’s how:
1-Write down the pixel dimensions of your image.
2- Divide that number by 300 (if the image does not include text), or divide it by 400 (if the image does include text. For example: An image without any text has a pixel dimension of 600x900 pixels. Once each dimension is divided by 300, the result is 2x3 inches. This means that you can use this image at 2x3 inches or smaller in your layout and get quality printing results.
If your image editing software does not tell you the pixel dimensions, but it does tell you the resolution, then you know the maximum size you can use that image in your layout. We suggest images be at 300 dpi in final layout size, and 400 dpi if images include text.
Can I enlarge the photos after scanning them?
One thing not to do is scan at 300dpi, then enlarge the picture by 200% in your layout program! It's also not a good idea to simply lift an image from a website and use it in your layout. Typically the resolution is only 72dip, and will look very blurry once printed. File formats like GIF or JPG compress the color and pixel resolution, causing color shifts and fuzziness. Since these image formats dominate the web, it's best not to use them for the aforementioned reasons.
Please keep in mind that resolution and physical dimensions are in direct proportion to each other. That means that if you have an image that is 2x2 at 300 dpi and increase its size in the layout to 4x4, the new resolution is now 150dpi. Keep in mind that when you bring an image in to your layout, you can shrink it down in size up to 20% increment is acceptable, but not recommended (because the resolution will increase). You will be limited to how far you can increase it in size.
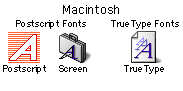
Do I need to send you my fonts?
Yes, you will have to gather copies of all the fonts you used and send them to us with your layout file.
 |
It is very important in order to avoid any reflow in the text that you
do not add any style to the fonts from "Type Styles" option
in Mac and Windows formats (don't use BOLD or ITALIC from the font style).
Instead use fonts from the original font family (i.e Helvetica Bold or
Helvetica Italic).
 |
Will my printed piece look exactly like it does on my computer monitor?
There are some small differences. Scanners and digital cameras use combinations
of three colors, Red, Green and Blue (called "RGB"), which are
also the colors computers use to display images.
Printing presses however, use a different process and set of colors: called
"CMYK". CMYK refers to the primary colors of pigment Cyan, Magenta,
Yellow and Black, which are the inks used on the press, also known as
full color printing.
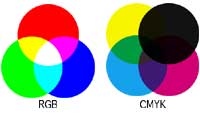  |
The combination of RGB light creates white, while the combination of CMYK
inks create black. It is therefore, physically impossible for the printing
press to exactly reproduce colors as we see them on the monitor.
This means that your RGB file must be translated to CMYK in order to print
it on a printing press. This is easily done using photo a editing program.
Many image-editing programs such as Photoshop, have the capacity to convert
the images from the RGB color space to the CMYK color space. We request
that you convert your colors from RGB to CMYK if your tools allow this
possibility. When you do this conversion yourself, you have maximum control
over the results. You may notice a shift in color when converting from
RGB top CMYK.
If you don't like the appearance in CMYK, we recommend that you make adjustments
while working in CMYK (usually lightening). You should specify CMYK color
builds that look lighter than you want, since the dots of ink "fatten
up " on press, giving you more pigment on paper than you see on your
monitor. It helps too, to be especially careful to keep backgrounds light
if there is black or dark colored text in order that it can be read.
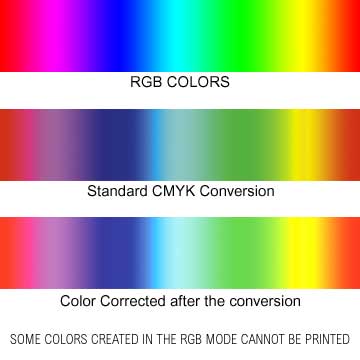
Why should I do the RGB to CMYK conversion before sending your images?
Why? You will have more control over the appearance of your printed piece.
If we do the conversion it is a standard-value conversion, which means
the results may not be perfectly to your liking. Please take the time
to prepare your file properly, and be sure not to furnish low-res or RBG
images because we cannot be responsible for sub-par results if you do.
Be aware too, that it is possible to create colors in RGB that you can't
print in CMYK, (said to be "out of the CMYK color gamut"). What
happens is the translator gets as close as possible to the appearance
of the original and that's as good as it can be. Therefore, it's best
to select any colors you use for fonts or other design elements in your
layout by using CMYK definitions instead of RGB.
|
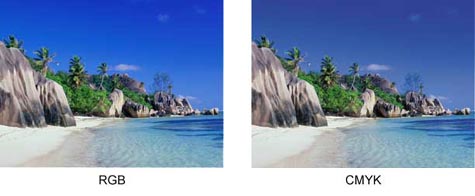
Thankfully, color photos
don't suffer much from CMYK translation.
  |
Can I use colored text?
We don't recommend it in small (less than 12- point size) because the
words appear hard to read and it tends to look unprofessional. Also don't
use knocked out type (white on dark background in small size and thin
fonts). When you colorize small text, the variance in the color consistency,
that is the cyan, magenta, yellow and black portions of the characters
don't line up exactly. This is called misregistration which result in
little colored halos around the characters.
Can I put text over an image?
Yes, you can use a text with a light color in the dark areas of the image,
or dark text in the light colors of the image. Keep in mind though, that
text of any color, especially on top of a photo can be very hard to read.
The secret is to lighten the photo much more than you may think necessary
when you use Photoshop or other photo-editing program.
What are bleeds and do I need them?
"Bleeds" refers to the saturation of color that goes to the
very edge of the paper in your printed piece.
How to achieve this affect:
 In
the image editing program (i.e. Photoshop), make sure that the image size
is larger by .25 inches in the width and height. That is, it should be
larger than the final (trim size) of your printed piece.
In
the image editing program (i.e. Photoshop), make sure that the image size
is larger by .25 inches in the width and height. That is, it should be
larger than the final (trim size) of your printed piece.
In the page layout program (i.e. Quark, Pagemaker) make sure that the
document size is your final trim size and extend the photo background
to 1/8" outside the edge of the page where it will be trimmed after
printing.
Please note that there is no extra charge for bleeds at CMYKnet.com.
Will you match the colors from a sample I print
out from my printer, or a previously printed sample?
Due to the widely varying results from the different output devices (i.e.
inkjet, laser printers, continuous tone proofing devices and different
than true offset printing), there is no guarantee that your finished piece
will mirror your printed sample. There can be significant differences
in results, even from one commercial printing firm to another.
We will send you a color proof before we begin printing your job (Iris,
C Print, ...)
If you require precise color match, please contact us to arrange for a
film-based Press-Match proof. This service starts at $120 per page. Once
you approve the additional fees, we will produce and send you a hard proof
via overnight delivery. Once you approve and return the proof we will
match the color of the proof (as close as technically possible) when printing
your final piece. Also, be aware that if you request color correction
or other changes (after you've seen your proof), there will be a minimum
of an additional $75 hourly rate charge and the cost of a new proof set.
CMYKnet Creative Services
ART DIRECTION • PHOTOGRAPHY • GRAPHIC DESIGN • DIGITAL
RETOUCHING • PRINTING
20 West 22nd Street, Suite 808, New York, NY 10010
TEL: 212-463-8880 • 800-214-8812 • FAX: 212-463-8838
For more information, please contact admin@cmyknet.com